NOTE: This installation guide is for two-channel and three-channel cameras. Skip some parts if the camera model is one-channel. The latter part of this guide includes the installation of a parking mode add-on/accessory.
For 2CH Camera Models: Install the front camera behind the rearview mirror. Install the rear camera at the top of the back windshield. Remove any foreign matter and clean and dry the windshield before installation.


For 3CH Camera Models: Install the front camera behind the rearview mirror. Install the infrared interior camera at the top of the front windshield. Install the rear camera at the top of the back windshield. Remove any foreign matter and clean and dry the windshield before installation.
 Warning
Do not install the product in a location where it can obstruct the driver’s field of vision.
1. Turn off the engine. Open the cover of the microSD card slot, gently push the card into the slot until it locks into place and close the cover.


2. Peel off the protective film from the double-sided tape and attach the front camera to the windshield behind the rear-view mirror.


3. Adjust the angle of the lens by rotating the body of the front camera. We recommend pointing the lens slightly downwards (≈10° below horizontal), so as to record video with a 6:4 road-to-background ratio.

4. Peel off the protective film from the double-sided tape and attach the rear camera to the rear windshield. Adjust the angle of the lens by rotating the body of the rear camera.
5. a. For 2CH: Connect the front camera (‘Rear’ port) and the rear camera (‘V out’) using the rear camera connection cable.

5. b. For 2CH (DMC200): Adjust the angle of the lens by rotating the body of the DMS camera and mounting bracket. Peel off the double-sided tape. Attach the DMS camera to the windshield or dashboard.
A) Dashboard installation
B) Windshield installation
Connect the front camera (‘Rear’ port) and the DMS camera (‘V out’) using the DMS camera connection cable. Use the pry tool to lift the edges of the rubber window sealing and molding and tuck in the DMS camera connection cable.

Connect the DMS camera (DC in) using the DMS camera hardwiring cable (2p) to a car fuse. Skip to procedure 12 for the hardwiring power cable setup.

5. c. For 3CH (IR Camera): Connect the front camera (USB port) and the infrared interior camera (‘V out’) using the infrared interior camera connection cable. Connect the front camera (‘Rear’ port) and the rear camera (‘V out’) using the rear camera connection cable.
5. d. For 3CH (DMS Camera DMC100): Connect the front camera (USB port) and the infrared DMS camera (‘V out’) using the USB connection cable. Connect the front camera (‘Rear’ port) and the rear camera (‘V out’) using the rear camera connection cable.
6. Use the pry tool to lift the edges of the rubber window sealing and molding and tuck in the rear camera connection cable.
a. 1. For 2CH (Regular):
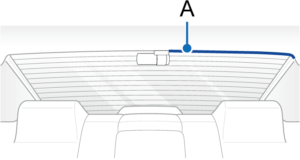
A) Rear camera connection cable
a. 2. For 2CH (IR Cam):

A) Interior/rear camera connection cable
B) Power cord
a. 3. For 2CH (DMC200):

b. For 3CH (DMS Camera DMC100):

A) Power cord
B) DMS camera connection cable
C) Rear camera connection cable
7. Connectivity Module (Optional)
For 2CH: Connect the connectivity module to the front camera and attach it to the edge of the window. Use the pry tool to tuck in the cable.

For 3CH: If you want to use the interior camera and the connectivity module at the same time, use the USB hub (included in the package). Connect the USB cables of the interior camera and the connectivity module to the hub. When the cables are all connected, close the cover of the hub and use the Allen wrench to tighten the screw. After that, connect the hub to the front camera and attach it to the behind of the rear-view mirror. Attach the connectivity module to the top corner of the windshield. Use the pry tool to tuck in the cables.

A) Multiple USB ports
B) Cover
 Note
• Interior camera connection cable or Connectivity module cable can be connected to either port of the USB hub.
8. Plug the cigarette lighter power cable into the cigarette lighter socket and the front camera. Skip to 12 for Hardwiring Power Cable setup.
9. Use the pry tool to lift the edges of the windshield trim/molding and tuck in the power cord.
For 2CH Camera Models
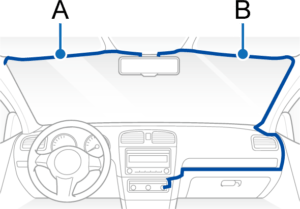
A) Rear camera connection cable
B) Power cord
For 3CH IR Camera Models

A) When using dashcams only
B) When adding a connectivity module
For 3CH DMS Camera Models
A) When using dashcams only
B) When adding a connectivity module
10. Turn on the engine. The BlackVue dashcam will power up and start recording. Video files are stored on the microSD card.
11. Turn off the engine. The dash cam will automatically stop recording and power down. To record in parking mode while the engine is off please connect the Hardwiring Power Cable (included in the box) or install a Power Magic Battery Pack (sold separately). A Hardwiring Power Cable (included in the box) uses the automotive battery to power your dashcam when the engine is off. A low-voltage power cut-off function and a parking mode timer to protect the automotive battery from discharge are installed in the device. Settings can be changed in the BlackVue App or Viewer.
12. Locate the fuse box to connect the hardwiring power cable.
Note
• Location of the fuse box differs by manufacturer or model. For details, refer to the vehicle owner’s manual.
12-1. After removing the fuse panel cover, find a fuse that powers on when the engine is turned on (ex. cigarette lighter socket, audio, etc) and another fuse that remains powered on after the engine is turned off (ex. hazard light, interior light). Connect the ACC+ cable to a fuse that powers on after the engine start, and the BATT+ cable to a fuse that remains powered on after the engine is turned off.
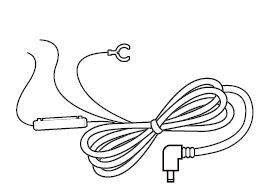
Note
• To use the battery saver feature, connect the BATT+ cable to the hazard light fuse. The functions of fuses differ by manufacturer or model. For details, refer to the vehicle owner’s manual.
12-2. Connect the GND cable to a metal ground bolt.
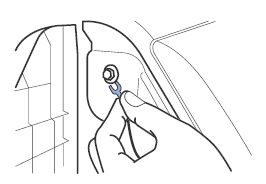
13. Connect the power cable to the DC IN terminal of the front camera. BlackVue will power up and start recording. Video files are stored on the microSD card.
Note
• Up to 50 event recordings (impact, manual) can be locked from being overwritten. By default, this feature is enabled. In the firmware settings, you can choose to either overwrite them with new event files when the event file storage is full or lock the 50 event files and save the new event files in loop recording storage. Please note that formatting the microSD card deletes all the recordings including the locked event files.
• The recording LED is on while recording (default setting) and the GPS LED is on when a GPS signal is received. There are 4 recording modes: Normal, Event, Parking, and Manual. The dashcam starts recording in normal mode, switches to event mode when an impact is detected, and switches to parking mode when the vehicle is turned off (Hardwiring power cable, ACC+) or stationary for 5 minutes (Cigarette lighter power cable, G-sensor). Touching the proximity sensor turns on/off audio recording or triggers manual recording depending on the firmware settings.
• When you run the dashcam for the first time the firmware is automatically loaded onto the microSD card. After the firmware has been loaded onto the microSD card you can customize settings using BlackVue Viewer on a computer.
Installation basics
Proper installation of your BlackVue dashcam is crucial for optimal performance, safety, and longevity. Follow these guidelines for a clean, secure fit—whether you’re using the latest X-Series, a dual-channel model, or an add-on module.
1. Preparation and safety
- Turn off the vehicle’s engine and remove keys before starting installation.
- Gather all components: front/rear cameras, mounts, cables, power accessories (hardwire kit or cigarette adapter), cleaning supplies, and a plastic trim/pry tool.
2. Location selection guidelines
- Front camera: Place behind the rearview mirror, high enough to avoid blocking the driver’s field of vision.
- Rear camera (if applicable): Attach at the top center of the rear windshield or, for specialized models, as directed in the manual.
- Clear visibility: Ensure the lens faces the road with an unobstructed view—avoid tint lines, sensors, or window stickers.
- Power module/Battery: Install near the vehicle’s fuse box or in the glove compartment for easy access.
Tip: Choose installation spots away from airbags, especially when routing cables behind trim panels.
3. Surface preparation
- Clean the mounting areas with an alcohol pad to remove dust, oil, and moisture.
- Allow surfaces to dry completely before applying adhesive mounts.
4. Step-by-step installation
A. Insert the microSD card
- Open the SD card slot cover on the front camera.
- Gently insert the card until it clicks into place; close the cover.
B. Mount the front camera
- Peel off the adhesive film from the bracket’s tape.
- Attach the camera firmly to the windshield, behind the rearview mirror.
-
Adjust the lens angle. For most vehicles, a slight downward tilt (~10°) yields a 6:4 road-to-sky ratio for optimal footage.
C. Mount the rear camera (dual/triple models)
- Peel adhesive film and fix the rear camera at the windshield’s center top.
- Adjust the angle as needed.
D. Connect cameras
- Plug the rear camera cable (coaxial/analog per model) into the front unit, then into the rear camera.
- Tuck cables along the headliner and rubber weather seals using a trim tool for a neat finish.
E. Connect the power cable
- Cigarette lighter adapter: Plug into the vehicle’s 12V outlet for easy, non-permanent setups.
- Hardwiring (for parking mode/advanced features): Use the 3-wire hardwire kit (ACC/BATT/GND) and connect to the respective fuses and an unpainted metal ground point. Use fuse taps as required.
-
For add-on battery packs, connect as per the battery kit instructions.
F. Hide and secure cables
- Run cables behind trim panels, under floor mats, or along headliners to keep them out of sight and away from moving parts.
- Use cable clips and zip ties to secure excess slack.
G. Power on and test
- Start the engine or turn on accessory power.
- Confirm camera LEDs and chime indicate normal operation. Check live view via the BlackVue app for precise camera alignment.
5. Common tips for reliable installation
- Do not remove power during initial boot or while formatting the SD card.
- Double-check all connections (firm cable insertions, correct fuse taps, and secure mounting).
- Avoid blocking airbag deployment zones when tucking cables.
- Leave a small service loop (extra slack) near connection points for easy disassembly in the future.
- Download and register with the BlackVue app for customer support and wireless setup.
- Test Parking Mode functions if hardwired or using a battery pack, and adjust power management settings as needed.
Removing and inserting the front camera
A) Connectivity details label: Default Wi-Fi SSID / Default Wi-Fi password / Cloud code / QR code
B) Serial number label
- To remove the dashcam from its bracket, press the LOCK button and pull the dashcam out of the mounting bracket.
- To insert the dashcam into its bracket, push the dashcam into the mounting bracket until it “clicks” in.
Removing and inserting the rear camera
- To remove the rear camera from its bracket, hold the mounting bracket and pull the rear camera out.
- To insert the rear camera into its bracket, push the rear camera into the mounting bracket until it “clicks” in.
Installing the DMS Camera (DMC100)
Peel off the double-sided tape and attach the DMS camera to the dashboard or bottom of the front windshield. Adjust the angle of the lens by rotating the DMS camera. Point the lens so that your face is visible on the DMS camera.
(Optional) For a more secure attachment to the dashboard, use the screws included in the box.
NOTE
- Depending on the mounting position of the product, DMS functions may not operate normally.